For ShipRite Global Connect
How do I make my address the default Ship From?
From the Main Menu, choose Setup: General Setup Options. On the Global Features tab, choose the SETUP – Default Ship From option. On the right of the screen hit enter – if you do not have your store name and address entered in the Contact Manager, this is where you will add the information and then set it as the default ship from address.
How do I edit an address that has already been saved?
If you notice an error in the address before the package has been shipped, in the ShipMaster screen with the address appearing in the ‘Ship To’ text box, right button click in that box and select Edit Consignee. Make corrections through the Contact Manager and then click on Save/Select. If the label has already been printed, you will need to cancel that shipment and re-do it. If you are still in the POS screen, and the transaction has not been settled, you can highlight the shipment and delete it so you can redo it. If the transaction has already been settled, you will need to go into the Shipment History, click on the shipment to highlight it and then click on the delete button. You cannot change the address on a label that has already been printed.
Download this file and follow the instructions: ShipRiteBackupInstructions.pdf.
View the PDF instruction document HERE
The “Inventory Price Labels” feature allows you to print bar-coded price labels from your ShipRite inventory onto Avery 3160 (or equivalent) through a Laser/Inkjet printer OR with your Dymo Label Printer.
To Print Labels:
1. From your main screen, go to Actions > Inventory
2. In the lower left corner, you can limit the view by SKU, Description or Department. Once you have the parameters typed in click the ‘Refresh’ button. This will narrow your selection down.
3. On the top menu click Print > Inventory Price Labels. Only the items selected will appear in the pop up window where you can narrow down your selection even further by entering the number of labels you want to print for each individual SKU. If you do not want a particular label to print, set the quantity to 0.
4. Choose either a sheet of labels on a laser/inkjet printer or individual labels on a Dymo printer. (make sure to take out your stamps and put in labels)
5. Click the “next” button and your labels will print out.
The labels will look like this:
You can use them to put on the end of a scan tag hanging on the wall, or to make a ‘cheat sheet’ to keep at the counter to scan items.
See instructions on the Documentation Page.
How do I setup the Speed SKU buttons in the POS?
You will notice an array of buttons on the right side (4 across and 5 down). These are the programmable Speed SKU’s. They will apply an inventory or non inventory item with the single click of a mouse. From the figure above you will see that some buttons are pre-programmed. It is important to note that you can change, delete or edit these buttons according to personal preference. Group: Let’s add a group of buttons for the COPY department or Profit Center. GROUP: The buttons displayed on the MAIN panel are mostly all groups. If you click on any one of them, an array of 20 more programmable buttons will be displayed. The 20 new buttons can be either Speed SKUs’ or Groups. To add a new group, click on any empty button. The Button Maker opens up. SKU: You can add a SKU item as long as it is already stored in inventory. To add an inventory SKU: Click on any empty button. After the screen opens up. Press Enter in the SKU field. The drop down list of available SKU’s will be displayed. Select your inventory item by double clicking. You can then complete as seen below. There is a lot of room in this POS Screen for more buttons to be programmed. Feel free to set the buttons up according to personal settings. In this example, a button is added that will result in the sale on one roll of tape with a cutter.
*Double click in the SKU field and a drop down list of the SKU will appear.
*If you know the SKU by heart, you may just type the SKU in the text box and press ENTER. If there is no SKU for the item you wish, click the ADD button. The Inventory manager opens up.
*You may then add the item you need.
This Button Maker is three dimensional. After you program a new group, an array of 20 buttons is created behind it. As a matter of convention, always leave the bottom right button as the GO BACK button. Try to keep the buttons grouped together generically, perhaps by department. We have included some of the buttons pre-programmed. It is important to note that you can add, delete or edit these default buttons to suit your needs.
Download this file and follow the instructions: Refunds_Guide.pdf
See printer driver links in the support menu under Support -> Printer Drivers
PLEASE READ BEFORE CONTINUING….
In order to continue, you must read this disclaimer and notes on integrating Quickbooks™ and ShipRite™ Global Connect. These instructions are for those who will create a NEW Quickbooks Company file. If you already have a Quickbooks Company file you have been using, contact ShipRite™ Support for different instructions. ShipRite™ will only work with Quickbooks Pro 2005 or higher. ShipRite™ will not be responsible for any corruption or loss of data associated with the process of integrating Quickbooks and your ShipRite™ software.
Quickbooks Integration Disclaimer:
October 10, 2016
*ShipRite™ Global Connect uses Generally Accepted Accounting Principles (GAAP) to process drawer closings. This is accomplished by producing a pair of General Journal Entries (GJE). One entry is to debit cash and credit sales and the other entry is to debit sales and then credit the various sales departments. As drawers are closed, the journal entries are batched while waiting for management review and then subsequent posting to QuickBooks.™ It is the store owner’s responsibility to REVIEW the pair of GJE before posting to Quickbooks. ShipRite™ Software, Inc. is NOT responsible for ensuring the accuracy of the entries either in ShipRite, or in Quickbooks.
*ShipRite™ is NOT responsible for teaching the store owner, or any of its employees accounting, or how to use Quickbooks. You have the option of learning this on your own, taking a course on Quickbooks or rely on an outside accounting professional. The concepts are not difficult, but are outside the scope of the training provided by ShipRite Software, Inc.
*Custom setup of the Chart Of Accounts allows user control over Company Setup. After installation, a default set of accounts is installed. The user may add accounts or remove accounts. Accounts can be added at a later time and the update process can be re-run. The names in QuickBooks must match what is in the ShipRite Quickbooks module.
*Transaction logging is created to review the results of postings to QuickBooks. This allows you control over what is posted to Quickbooks.
*We have created a new QuickBooks database for easy segregation of transaction processing. If you have trouble, you will only need to send us the Quickbooks database.
*All database access is done using the disconnected data model and command level SQL (standard query language) updates. A SQL transaction log records all updates to the databases into a log file. This will tell us what was entered when a problem occurs.
Prevent updates to the wrong company by checking which QuickBooks company is opened before posting.
*ShipRite™ will not be responsible for any corruption or loss of data associated with the process of integrating Quickbooks and your ShipRite™ software.
QuickBooks Pro Desktop Software Integration (Please note that these instructions are NOT for QuickBooks ONLINE
Where To Load Quickbooks: If you have more than one computer running ShipRite™ Global Connect, determine where you will be doing your accounting work with Quickbooks. Most users with multiple POS will have a back-office computer. (For security purposes, it is not recommended to have QB on any POS computer that your employees have access to.) ShipRite must be installed on the accounting computer. Make sure that ShipRite is properly networked on all computers as per our networking instructions. The posting to Quickbooks after closing a drawer must be done from ShipRite on the same computer.
Install QuickBooks on the designated computer. After installing QuickBooks, DO NOT create a company profile.
Download the QuickBooks Integration Package and extract its contents into your C:\shiprite folder. This needs to be done only on the computer that has Quickbooks installed. (If you are running Quickbooks on a workstation, then you will need to download and unzip the integration package on the server also.)
To get ShipRite ready, you must make sure that EVERYTHING you sell in your store has a DEPARTMENT and DESCRIPTION assigned to it. If you do not, you will get an error message when attempting to POST to Quickbooks. To check this go to “POS.” Click on the menu item “PLU”. In the Inventory Master screen, select the “Column Header” label that says Department. This will sort the inventory list by department, alphabetically.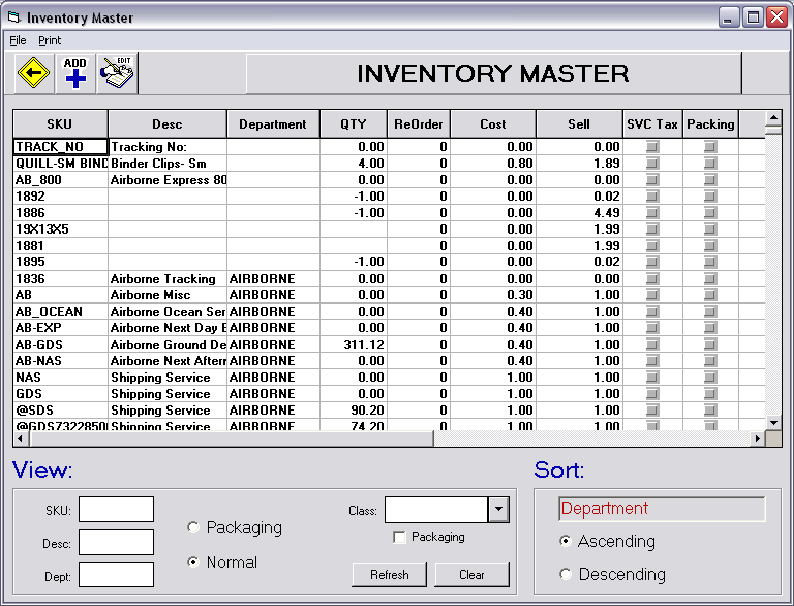
As you can see in the diagram, the blank items appear at the top of the list. Correct both the blank Departments and blank Descriptions. You can merely enter them in the inventory master list. Close ShipRite.
Start Quickbooks. If a company opens, go to: “FILE > CLOSE COMPANY.” With no company open, click on “Open an Existing Company.” In the “Look in Text Box,” you must browse to the C:\shiprite folder.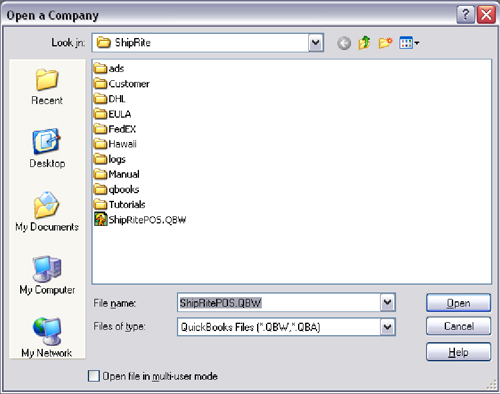
You will see an existing file: “C:\ ShipRitePOS.QBW.” Click “OPEN.” The Quickbooks Learning Center opens. It is suggested you use the training tool. For now, click on “Begin Using Quickbooks” on the bottom right. Right now, your chart of accounts is blank except for 3 payroll accounts. You will also have 1 vendor now: Dept of Tax and Finance. This is your sales tax collected account.
Minimize Quickbooks by clicking on the __ underscore in the top right handler. Start ShipRite Software. Now both Quickbooks and ShipRite are open. From ShipRite’s main menu, go to “ACTIONS > Quickbooks Management Module.” The Chart of Accounts is the first Tab control. The “CREATED” column should be blank. If it is not, perform step 2 above. Select: “UPDATE QUICKBOOKS.”
You will now get the QB Security window popping up. Select “YES.” Always allow access even if QB is not running.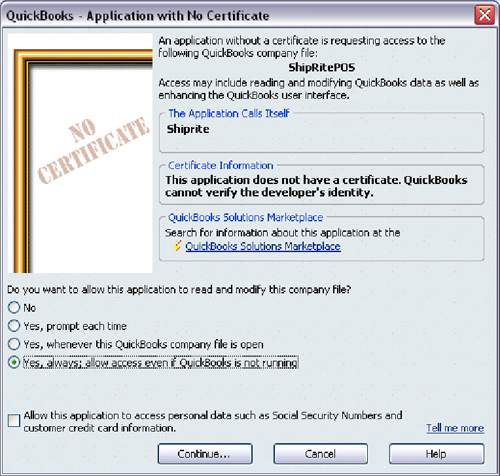
Click “Continue.” You will get another window popping up.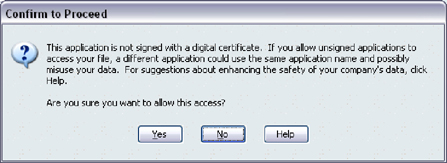
Select “YES” to continue. Then Select “DONE” on the next window.
A Chart of Account is now created in ShipRite. This will take about 2-3 minutes. If successful, you will get a message box popping up: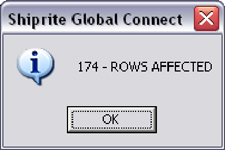
Click “OK.” You will now see “DATES” in the created field in the ShipRite Chart of Accounts. It may have more or less than 174 rows.
You are ready to open the drawer and perform sales. It is best to assign unique Drawer IDs to each station. However, you may use one for all stations but solving discrepancies will be more difficult. In mom & pop organizations, the same drawer ID on all computers should be fine.
USING QUICKBOOKS
After doing your day sales, close the drawer. From
“POS” go to “ADMINISTRATION >POS
MANAGER >CLOSE DRAWER.” Close your drawer like normal. Print your report at the end of the Close Drawer process. After you select “SAVE,” it will take a minute or 2 to prepare the journal entry.
Go back to the QuickBooks Manager and go to General Journal. You will see one General Journal Entry (GJE) for each drawer closing. You may go several days without actually posting to QuickBooks. This is up to the user discretion. The “Folio” column is the column accountants use to indicate that an entry has been posted to the General Ledger; which in this case is QuickBooks. A “”P”” denotes posted to QuickBooks.
Click on “”POST ALL ENTRIES”” to post all outstanding GJEs. Generally, at the end of the day, if all entries look proper, you will POST ALL ENTRIES.
Go to QuickBooks and verify Account Balances. Go to: “LISTS > CHART OF ACCOUNTS. After you post to QB, you should see a money entry in UNDEPOSTIED FUNDS. Now it is time to MAKE DEPOSIT.
Go to: “BANKING > MAKE DEPOSITS.” You will see each deposit that is sitting in UNDEPOSITED FUNDS. Click on the DEPOSIT you will make. If you are going to make all of them at the same time, place a checkmark next to each deposit. Select “CONTINUE.” In the next screen, make any needed adjustments, like paying the window cleaner or other payment out of your drawer.
Quickbooks and ShipRite in your Store
You now have 2 power softwares working together to help manage your business. Each has many features and functions. Some of those features overlap. Here is the recommended system to use in your store. Keep in mind this is a recommendation based on years of experience operating this type of business. You are free to use whatever makes you comfortable.
Department Creation: Originated in ShipRite and passed to Quickbooks
Sales Data by Department: Originated in ShipRite and passed to Quickbooks
Sales Tax Collected: Originated in ShipRite and passed to Quickbooks Sales Tax Collected
Originated in ShipRite and passed to Quickbooks Undeposited Funds
MC/VISA/DISC/AMEX: Originated in ShipRite and passed to Quickbooks MC/VISA Recv
Accounts Receivable: Originated in ShipRite and passed to Quickbooks as a summary entry
AR Statements and Aging Summaries: ShipRite
Writing Checks to Vendors: Quickbooks
Calculation of Cost of Goods Sold: Quickbooks (posted each time you write a check to suppliers)
Profit and Loss Statement: Quickbooks Revenue figures come in from SR, COGS from writing Checks
Sales Tax Collection Reports: Quickbooks
Deposits: Quickbooks from Undeposited Funds account
Credit Cards Deposit: Quickbooks from MC/VISA Recv
When a drawer is closed, in the ShipRite QB Manager, a double entry is loaded and ready for posting. You should review it PRIOR to POST ALL ENTRIES. You will notice that both entries balance. If there are no errors, select “POST ALL ENTRIES.” You may do this immediately after closing the drawer, or once a day for multiple drawers, or once a week. Most stores do it once a day.
Here is the way Quickbooks works for you:
ShipRite controls the flow of Revenue into Quickbooks. Writing checks in Quickbooks controls the money flowing out. At the end of the month, you can run a PROFIT AND LOSS report to see how you are doing. It is important that you do both to get an accurate number that you can rely on.
TROUBLESHOOTING POSSIBLE ERRORS:
1. ERROR: “Unrecognized Database format.”
FIX: Go to “My Computer” > “Local Disk C” > “Shiprite” > “Logs.” Right click on the “transaction.log” file and delete it.
2. ERROR:
“Attention…Cannot close the Gate.”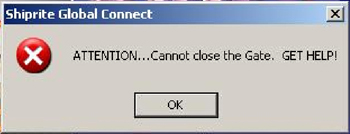
FIX: Go to “Actions” > “Quickbooks Management Module”> “Support” > “Reset Transaction Gate”
3. ERROR:
“Run-time error ‘429’ ActiveX component can’t create object.”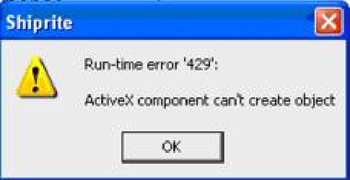
FIX: You will need to download a missing dll file HERE and save the file to your “C:\Program Files\Common Files\Intuit\QuickBooks” folder. Next, click on your windows taskbar and choose: “Start > Run” then type the following (or copy and paste) in the dialog box:
regsvr32 “C:\Program Files (x86)\Common Files\Intuit\QuickBooks\qbfc4.dll”
Click“OK.” You will get the following message:
How do I delete a package?
From the main menu of ShipRite click on the Actions pull down menu, select Shipment History, highlight the package you would like to delete, click on the garbage can icon (DEL) and then confirm the deletion by clicking on yes.
Reprint a label?
From the main menu in ShipRite click on the Actions pull down menu, choose Shipment History. Locate the package from the list of shipments, highlight the package and click on the label button at the top of the Shipment history screen.
How to do International Shipping?
View the PDF instruction document HERE
What are the options created by right clicking on the service buttons?
When you are in the ShipMaster screen, Take the RIGHT button of the mouse and click on any button. You will get a drop down menu:
Check if Service is Available – this will tell you if that service is currently available to that destination.
Check Time-In-Transit – This shows you the estimated date/time the package is estimated to be delivered.
Show Package Details – This shows you everything that is included in the price. The CHARGE column is the price you are charging your customer that includes your markup. The BASE column is the carrier’s Retail price, the Discounted Cost column is your actual cost based on your tier level with the tier level of the carrier.
Edit Button – ShipRite allows you to change the order in which the shipping buttons are displayed. Just enter the Button Maker and select the service you wish displayed here.
Delete Button – This will remove this button from the shipping choices.
Show /no Show Buttons – Each row has 7 buttons across. You may reveal the blank ones by clicking here. When you are done programming the buttons for your preferences, click on this again to hide the blank buttons.
Edit Master Shipping Table – This is a short cut to the Master Shipping Table for editing on the fly. Please remember that you must restart ShipRite to make the changes take effect.
Re-Manifest Existing Package – this option is not functional at this time.
Instructions are on the USPS Setup Page
Instructions are on the DHL Setup Page
Instructions are on the FedEx Setup Page
Instructions are on the UPS Setup Page
From the main menu of ShipRite, click on Setup > General Setup Options. Click on the Carrier setup tab. Select the carrier from the drop down.
FedEx and DHL have tier levels. UPS does not have tier levels anymore.
Click the following link to sign up for Shipsurance: Click this link
How do I put a Shortcut on the Desktop?
If you want a shortcut on the Windows Desktop, Right button click on any empty spot on the desktop. Select NEW: SHORTCUT In the text box above BROWSE button, enter C:\ShipRite\SRPRO.exe and click next. For the name, enter ShipRite. Then click FINISH. The new shortcut should appear.
Setup: Scale Configurations for Serial Port Connections:
At times the scale setting that are default in ShipRite may not work with the scale you are trying to setup. This primarily is caused due to the scale not being at the manufacturer’s default settings. Below is a list of setting that have worked with different scales based on their OS (operation system ie: Windows XP™, WIndows 98™, etc….)
Scale Setup with XP/2000 Detecto AS-350D
Port – Com1
Baud Rate – 9600
Parity – N
Data Bits – 8
Stop bits – 2
NCI Model 762075
Port Com1 Com1 Com1
Baud Rate 9600 9600 9600
Parity N O E
Data Bits 8 7 7
Stop bits 1 1 2
Mettler Toledo PS60 – This scale is supported on USB as is the Mettler Toledo PS6L
Port Com1 Com1
Baud Rate 9600 9600
Parity N N
Data Bits 8 7
Stop bits 2 2
Mettler Toledo 8213 Bench
Port – Com1
Baud Rate – 9600
Parity – N
Data Bits – 7
Stop bits – 2
Mettler Toledo 8213 Bench
Port – Com1
Baud Rate – 9600
Parity – N
Data Bits – 7
Stop bits – 2
Fairbanks
Port – Com1
Baud Rate – 9600
Parity – N
Data Bits – 8
Stop bits – 2
Setting default settings – Mettler Toledo PS60
Below are the instructions for re-setting the Mettler Toledo PS60scale to the manufacturers default settings: Once you do this – go back into Shiprite. From the main menu – go to Setup – general Setup Options – Local Features – click on SETUP – Scale – in the drop down box, select the PS60 scale and you should be fine.
1. Verify that there are no items ion the scale platter. The scale display should be reading 0.00 with a line over the LB sign and a line of ver the “0” with arrow pointing at it.
2. There are two buttons on the scale display – one with the two arrows going in circle (call this button A) and the other button with a zero in the center and two arrows pointing at it (call this button B)
a. Start by holding down button A firmly for about 8-10 seconds until you see the word SETUP on the display – then let go of the button (SETUP will change on the display)
b. Tap button A until you see the word END appear on your screen.
c. Go to button B and hold down until you see the word DEFAULT appear
d. Tap button B unit you see DEFAULT appear
e. Go back to button A and hold down for a moment and then let go
f. The scale will take a few moments and re-configure itself then should return back to “0.00”***The Mettler Toledo PS60 scales purchased through the UPS Preferred program are pre-programmed to UPS protocol. (Prot4) The must be programmed to Prot4 in order to be used by WorldShip.
1. Backup your ShipRiteTM database. (See FAQs if you do not have a backup routine). Do NOT update until you have performed a backup.
Start ShipRite on your ShipRite server from the main menu.
Go to “END OF DAY (EOD)” and then click on “PROGRAM UPDATE” in the top, right corner. When it is finished downloading, a “CLOSE” dialog box will appear.
Choose to “CLOSE” the program.
Exit then restart the program. Answer “YES” in the dialog box to load the update.
Click on the “INSTALL” in the dialog box. The update will now install.
2. After the files have finished extracting and the installation is complete, restart the program. You have now completed the update.
If you experience difficulties trying to update using EOD, try this method before contacting support:
1. Close Shiprite program on all your computers before performing this update. Download the latest Update: Click “run”button when prompted.
2. Follow instructions on the screen.
How do I locate the version number of the ShipRite Software I am using?
Enter ShipRite Global connect. The most current version will be displayed across the top of the screen. You can also click on the Help pull down menu and choose About. Under the image, will be your version number.
